Tutorial
In this tutorial we are going to assemble a simple scene containing a deformable object colliding with static scenery. The completed tutorial is available as the Tutorial scene in the scene folder.
For the purpose of this guides component names will be written in a mono-spaced font e.g. SimulationManager, whereas the names of GameObjects or EditorFields will be in italics e.g. HeartModel
Create a new scene in Unity
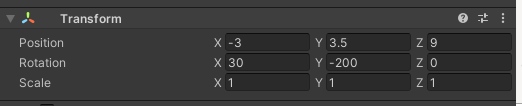
Set the Main Camera transform to the values as seen in the image below
Create a new gameobject and add a
SimulationManagercomponent to itThe
SimulationManageris a required component for all simulations using iMSTK-Unity, it controls initialization and updates and also lets you set a number of global variables.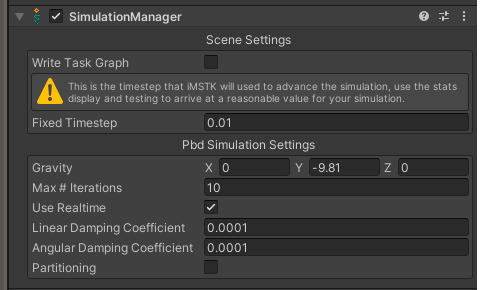
Create an empty GameObject, add a
Deformablecomponent and name it HeartModel.Deformableis one of the classes that iMSTK-Unity offers, it implements the PBD 1 and XPBD 2 methods for simulating deformable objects.We will add geometry separately but you can also use the items under the menu iMSTK\GameObject to add very simple objects with algorithmically generated meshes.
The
Deformablehas a large number of parameters but we will focus only on a few. This will eventually become a deformable object but there is still a lot of work to do. For more information look at the iMSTK DocumentationWe will come back to this later.
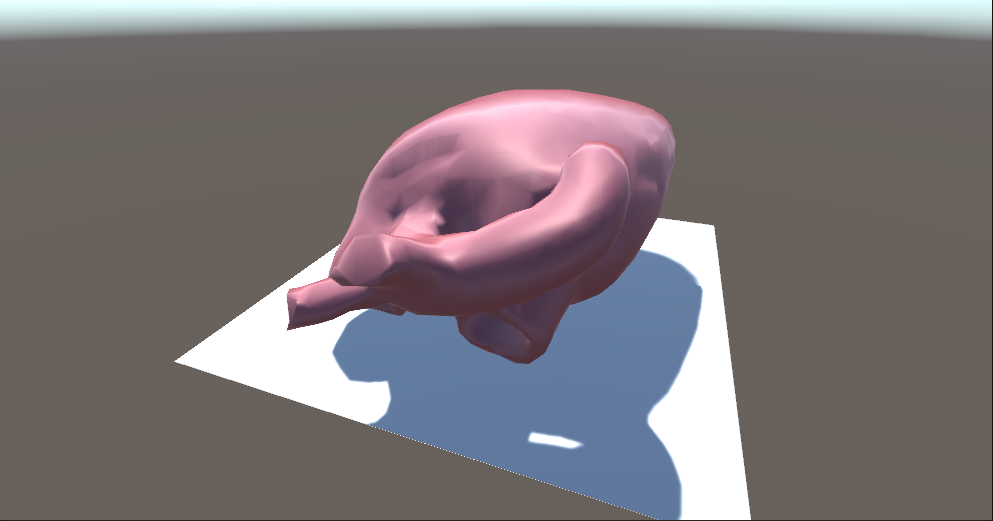
From the Models folder add model named heart under the HeartModel GameObject
This will serve as the visual representation of what the simulation is doing, to make it look better, get the flesh material from the Materials folder and assign it as well.
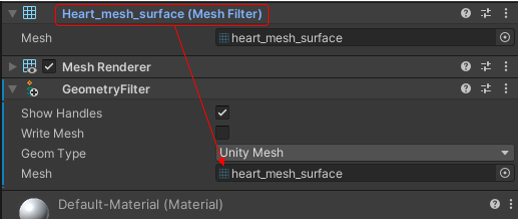
With the heart GameObject selected add a
GeometryFiltercomponent to it and drag the MeshFilter component, the name will be Heart_mesh_surface (Mesh Filter) into the Mesh field of theGeometryFilter. The drop down menu should say Unity Mesh. This makes this mesh available to iMSTK-Unity.For every kind of geometry you want to use in the PBD model, iMSTK-Unity needs a
GeometryFilter. This maps the Unity type to something that iMSTK can understand. It can also be used to define fixed shapes like Plane or Capsule. For meshes the source of a Geometry filter can either be a Unity mesh in the scene, a mesh asset, or (especially for tetrahedral meshes) an asset imported by the geometry importer of iMSTK-Unity.You can use the check box named Show Handles to verify that the mesh is in the correct location. If you don’t see the mesh, make sure the Gizmos are turned on for the scene view.
Set up the parameters for our
DeformableFirst check the Distance Stiffness, Volume Stiffness and fill in the properties as you see in the image below. This sets the material properties of this object. Uncheck all other stiffness options.
The
MassandUniform Mass Valuefields are dependent on each other. TheUniform Mass Valueis a per node/vertex value.Note
While iMSTK is inherently unitless, the default value in the simulation manager for gravity is 9.81 m/s^2. And the unmodified output of the haptic device in Newtons. If you want to use the default values, you should use meters and kilograms for your objects. Otherwise you need to modify the gravity and the
forceScalingparameter in theOpenHapticsDevice. To match the units you want to use.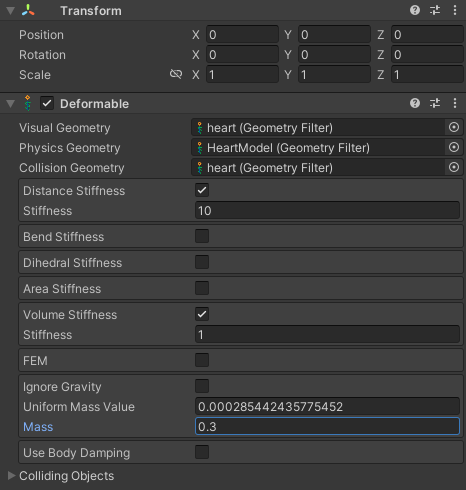
Add a
GeometryFilterto use in the simulationWe will need a mesh to use as the geometry for calculating the physical behavior of our object. Add a
GeometryFilterto the HeartModel object. As we will use a tetrahedral mesh, the method to assign the mesh is slightly different than what we used before. First Select Tetrahedral Mesh in the drop down menu. Then click on the o icon to the right of the Mesh input field. This will bring up an input dialog. Select the “Assets” tab, and double click the item name heart_mesh.As you can see the
GeometryFiltercomponent can be used for meshes in the scene or just assets of the project.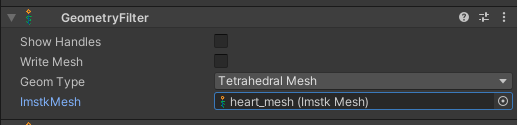
Now we will set the shapes that are being used for simulation and visualization.
The
Deformableuses three different geometriesVisual Geometry is the geometry that is being shown on the screen, this is usually some textured mesh
Physics Geometry is the geometry that is being used in the simulation
Collision Geometry is the geometry that is being used to determine collisions with other objects.
The tetrahedral mesh that was set up in the previous step will be used for the Physics Geometry; the other mesh from earlier will be used for the two other geometries.
First Drag the
Geometry Filterthat you just created into the Physics Geometry of theDeformablecomponent. Then drag the heart GameObject from the hierarchy view to both the Visual Geometry and the Collision Geometry fields.
As we used different geometries for visualization and simulation we need a way to keep those in the same state, this is the responsibility of the
GeometryMapcomponent. Add one and drag the HeartModel Gameobject into the Parent Geom slot. Then drag the heart GameObject into the Child Geom slot. Additionally make sure the Force One One is checked.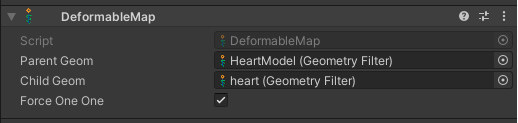
This concludes the setup for the Deformable object.
You should be able to run the scene now but as there are no other objects to interact with the heart will just succumb to gravity and drop on the ground.
Let’s add a plane for collisions
Instead of meshes we will use a fixed shape for the other side of the collision. In the hierarchy view add a Plane and move it to a position of 0.0, -2.5, and 0.0. Add a
Geometry Filterto the plane object and select Plane in the drop down menu. The default settings for the plane will work, its position and normal will be calculated from the transform. Even though the visual mesh of the plan is finite in the editor, with regards to iMSTK this plane is infinite.To enable the plane to interact with other iMSTK objects we need to set up a model for it as well. Add a
StaticModelcomponent to the Plane object and drag theGeometryFiltercomponent into the Collision Geometry field. AStaticModelrepresents an object that participates in collision but doesn’t react.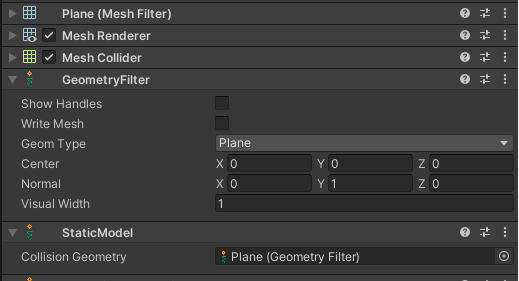
Add the interaction between the Heart and the Plane
iMSTK needs to know about which objects can interact with each other, in this case we want the heart and the plane to collide with each other. Click on the left pointing arrow at the bottom of the
Deformablecomponent to expand the Collision section. Here you will always see a list of all the objects that can be collided with, click on the checkbox next to “Plane” to enable the collision between the heart and the plane. In almost all cases you should be able to leave the other parameters at their default values.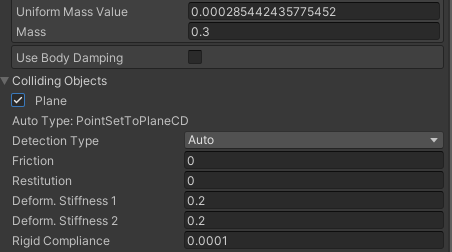
This concludes the tutorial scene setup, press play you should see the deformable object hit the plane and bounce slightly on it.
Please note that at the moment iMSTK-Unity is very sensitive to misconfigurations and may cause Unity to crash, we are working to improve the error handling and stability both on the Unity asset side and inside the iMSTK sources.
Example Scenes
ConnectiveTissue
Demonstrates the connective tissue attached to two deformable objects
Constraining
Shows various ways of how to constrain deformables to each other and to the surrounding space
PbdClothCollision
A scene with a freely moving deformable item (Cloth) that demonstrates how to set up a deformable (PBDCloth) with and various static obstacles.
PbdClothScene
A cloth constrained on the top that demonstrates how to set up boundary conditions on a PbdObject
PbdThread
This demonstrates a line mesh that can be used as a thread
RigidBodyScene
This is a simple example of two rigid spheres colliding with each other and the scenery. Uses geometric shapes rather than meshes, static colliders and collisions between dynamic objects
UnityController
Demonstrates how to control an iMSTK Rigid via a RigidController and a Unity transform. The syringe in the scene can be moved around via the keys, the UnityDrivenDevice takes the position and orientation of the object its assigned to and sends it to iMSTK. The object will collide with the cube in the scene. If you want to control and object in iMSTK via VR controllers this is the path to take.
Tutorial
A scene that is used in the tutorial. It uses a deformable model colliding with a plane
Devices
The scenes in the devices folder can only be used with VRPN or OpenHaptics built. You will have to build iMSTK and install it into the asset as described in Setup for Development to support these features. You can check for the supported devices in the installation that you have by opening the Edit/ProjectSettings/Player panel in the editor and navigating to the section Script Compilation. Any Devices that are built into your iMSTK installation will show up here as IMSTK_USE_<Device>. iMSTK-Unity will have code that is optionally enabled when one or more of the symbols in this panel is defined.
Grasping
This scene demonstrates how to use the SimpleGrasping component together with the GraspingManager to enable the grasping of different objects.
RigidController
This sets up a OpenHapticsDevice with a Rigid and a RigidController to show how these pieces are interactive
RigidControllerVRPN
Uses the VRPNDevice in the same scene as the RigidController
TissueContact and PbdThinTissueContact
Demonstrates the use of a rigid with haptics interacting with two kinds of simulated tissue
- 1
Müller, B. Heidelberger, M. Hennix, and J. Ratcliff, “Position based dynamics,” Journal of Visual Communication and Image Representation, vol. 18, no. 2, pp. 109–118, Apr. 2007, doi: 10.1016/j.jvcir.2007.01.005.
- 2
Macklin, M. Müller, and N. Chentanez, “XPBD: position-based simulation of compliant constrained dynamics,” in Proceedings of the 9th International Conference on Motion in Games, Burlingame California, Oct. 2016, pp. 49–54. doi: 10.1145/2994258.2994272.